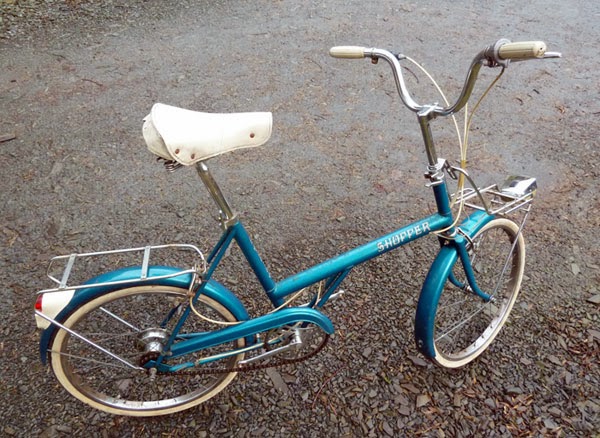
So here we are … 5 weeks, a little head scratching and gallons of tea have gone into turning a 40-something year old Raleigh 20 Shopper into a slightly shinier 40-something year old Raleigh 20 Shopper! The first post about this project was entitled ‘An exercise in pointless’ and I’m sure for many, that may still hold true, however if it brings a smile to someone’s face (me included) or makes someone question their perceptions, then it’s served its purpose well.
 |
| You could ride it but it wasn’t pleasant. |
Last time we looked, the frame alterations had been completed and the frame was awaiting blasting. It would have been easy to get the frame powder coated (especially when you consider that the blasters also do powder coating) but I thought that was too easy. Instead I decided to paint the thing and paint it the way most people would be forced too … with aerosols. It’s been a while since I bought any spray cans, so I was a little shocked at the price, if I had to pay £6 a can then painting rather than coating would turn out to be a really stupid and expensive option. As luck would have it, a roam around Charlies Discount store turned up just the thing, colours were limited but at £1.99 a can, I’m happy to live with Canary yellow. I won’t bore you with the details but I will say that there’s 20+ coats of paint on there, it was rubbed down after every second coat before finally been ‘polished off’ once it had fully hardened … if you don’t possess large quantities of patience, have yours powder coated!
 |
| A slightly more pleasant riding experience. |
With the frame all sorted it was time to start bolting bits back on. I mentioned the forks previously and aside from having to grind 1.6mm from the inner diameter of the crown race, they slotted into place as they should. Rather than shorten the steerer tube (which might have meant an even longer stem) I decided to leave it full length and made a spacer to cover it and the quill to aheadset adaptor. Obviously nothing’s straightforward, so it did mean shortening the top headset retaining nut too but I think it was worthwhile.
After going to the trouble of shortening and re-threading the bottom bracket I thought I’d treat the frame to a pair new cranks rather than using some old tat from the bowels of the workshop. A square taper Deore triple was acquired, stripped of its rings and a modified 42t singlespeed ring was persuaded to fit in the middle ring position. The ‘yes, I’m going to ride it off road’ theme was then enhanced by the addition of an e13 bashguard that was hiding under my workbench … if anyone really cares, a 68mm x 107mm bottom bracket was required to achieve a perfect chainline.
 |
| Carbon Fibre stand … just because. |
I’d made the decision early on to stick with the slightly obscure 451 20″ rims rather than switching to the much more common 406 variety. This caused me 2 issues … no one makes rims and no one makes tyres! Actually that’s a lie, people do produce both items but they’re much harder to come by and of course usually much more expensive, but if you look in the right places and take full advantage of the internet, it’s surprising what you can turn up. In this case it was a pair of Alienation Ankle Biter rims and Tioga Comp X tyres … it turns out that certain classes of BMX still use the size and there are still deals to be had if you take the time to look. Why didn’t I just use the smaller 20″ rims? Well, keeping the standard size rims retains the already modest ground clearance and negates the use of very, very long drop brake calipers. Maybe I’ll try some 46mm wide, drilled 406 rims next time for a ‘fat shopper’ look!
 |
| Sturmey Thumbie … updated retro chic. |
The rims were duly sent on their holidays to visit Shona and Rich at Keep Pedalling in Manchester. The original Sturmey Archer hubs, although grubby were actually serviceable but they were steel shelled and stupidly heavy. I toyed with the idea of going 7 speed by using a screw-on freewheel hub or keeping it as minimal as possible by following the singlespeed route but the lure of new aluminium bodied SA hubs was too much to resist … the decision was made even easier when Shona gave me the hub prices! The SRC3 rear hub shares a lot of DNA with the SA 3 speed hubs of old. The gear ratios are identical, it’s spaced at 118mm and still uses that little chain to change gear, just like your Grifter had. Another reason for choosing this hub over another, was the coaster rear brake. I’m fully aware that this may yet prove to be a poor choice but for the moment all is well, it keeps the rear end free of clutter, doesn’t require any adjustment and is a little quirky … which I like. If it does prove an unwise choice then I can remove the carbon planking plate from the seat stay bridge and bolt on a second rear brake in about 5 minutes … a bike with 3 brakes, even more novel.
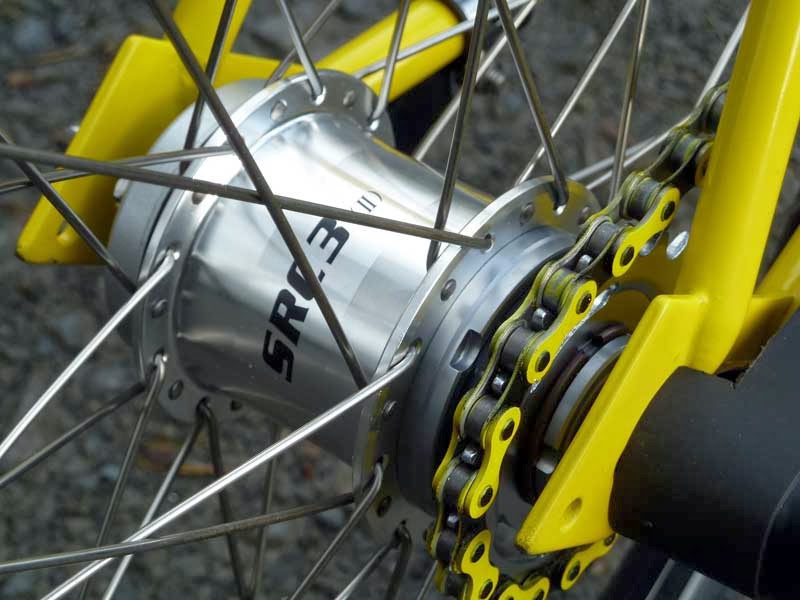 |
| Couldn’t resist the chain … sorry. |
Trying to achieve some kind of ‘normal’ riding position without using high rise bars is always going to require a few compromises. You’re going to either require a steerer tube in the region of 400mm, which in reality doesn’t exist or you need a very long, very angled stem. I had a steerer of just over 300mm, so guess what? That’s right, I’ve fitted the steering stem equivalent of the forth bridge on there. Bar choice was largely dictated by what I had sat about. Salsa Woodchippers were high on the list but there really wasn’t enough height to make them workable, so after trying various ‘normal’ bars and not ‘feeling it’ I settled on a pair of Titec Jones copies. Next time I’d seriously consider extending the headtube and machining up a new, extra long steerer … it’s a lot of work but would make the whole bike less awkward looking.
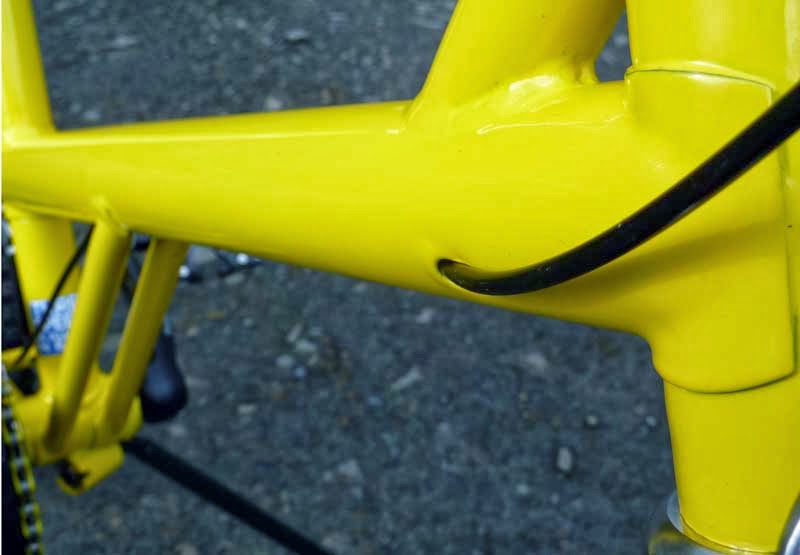 |
| Internal cable routing’s nothing new. |
Everything else on there is pretty much what you’d expect, nothing fancy or expensive just whatever cropped up cheap or was already in the workshop.
 |
| Angle of the new headtube brace is nearly spot on. |
The original bike was anything but svelte. Just picking it up to put it on the scales let you know that steel rather than aluminium was the main manufacturing ingredient. 38.5lb is a lot of weight, any bike weighing that much isn’t going to climb well … 20″ wheels and a 3 speed hub gear were only going to compound the fact. Happily, besides a make-over the Shopper also embarked on a diet and the results are quite impressive. It now weighs 25lb up and dressed, that’s 13.5lb less than it did 5 weeks ago. I’m hoping that decrease in weight will have a real effect on the actual usability of the thing.
 |
| More thin rather than fat bike. |
To earn it’s status as something suitable for bikepacking, a bike needs the capability to carry a certain amount of gear. A rear harness is no problem, it’s got a saddle and a seatpost but a front harness is a little trickier given the relationship between the bars and the fork crown. The eagle-eyed amongst you may have noticed a boss welded to the front of the headtube, this is threaded and accepts a bar that contains a spherical bearing. The straps of the harness fit round the bar (taking the place of the fork crown) and the bar pivots as you steer … hard to explain but obvious when you see it.
How about a frame bag? It’s on the cards but again given the shape of the frame and the lack of toptube, it’ll be a little different from the norm.
 |
| Seatstay bridge + carbon blanking plate = light mount. |
The real test as to whether it’s been an exercise in pointless or not will be a multi-day trip or 2. I’m planning a couple of things at the moment which will hopefully prove or maybe disprove the theory that you can ride anything … wish me luck.
Big thank you to Shona and Rich at Keep pedalling

Cool project and lots of detail with the pics. Can't see myself starting a similar project.