
More MYOG stove rubbish ... sorry.
Moderators: Bearbonesnorm, Taylor, Chew
-
Bearbonesnorm

- Posts: 24197
- Joined: Sun Jun 05, 2011 8:53 pm
- Location: my own little world
More MYOG stove rubbish ... sorry.
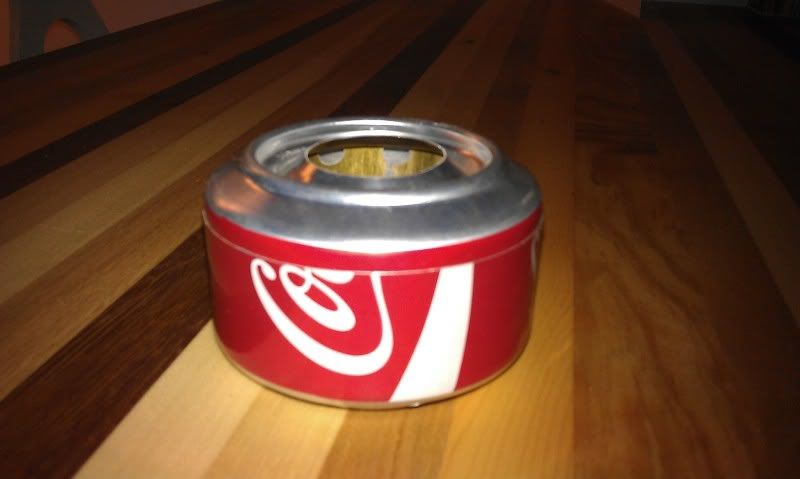
I've just made this for someone so I thought I'd bore you with a picture ... I'm not usually a great fan of penny type stoves but I / they wanted something with a smaller flame spread so it would suit a smaller pot. The windshield / stand can be used either way up and in doing so alters the flame spread and to a degree the heat output (it's all in the venting).
May the bridges you burn light your way
-
gairym

- Posts: 3151
- Joined: Tue Jan 10, 2012 11:05 am
- Location: Chamonix, France (but a Yorkshire lad).
Re: More MYOG stove rubbish ... sorry.
oooh, nice work sir.

Re: More MYOG stove rubbish ... sorry.
I like the look of that very much. Most of the meths stoves (bought or made) seem to have a wide flame spread. That would work great with something like an alpkit ti mug. 8-)
-
gairym
- Posts: 3151
- Joined: Tue Jan 10, 2012 11:05 am
- Location: Chamonix, France (but a Yorkshire lad).
Re: More MYOG stove rubbish ... sorry.
a quick question.....
from the photo it looks pretty much like the one i made but with the holes on the inside as opposed to the outside (thus the narrower spread of the flames).
but....this can't simply be the case because:
1. there's a funny little allen nut looking thingy in the middle.
2. the pot sitting straight on top on it would smother the flame - no?
so.....what is it i'm not understanding....?
what gives???
-
Bearbonesnorm
- Posts: 24197
- Joined: Sun Jun 05, 2011 8:53 pm
- Location: my own little world
Re: More MYOG stove rubbish ... sorry.
There's nowt fancy going on.
The bolt is just a blanker for the filler hole, without it there won't be any internal pressure when the thing gets hot. It's not a double walled affair like yours where the burning meths in the centre produces an increase in pressure within the outer ... this relies on the stove being 'sealed'.
The stove goes inside the cylinder shaped thing and the pot stands on top of that, so maybe a 2" gap between the stove and base of the pot.
May the bridges you burn light your way
Re: More MYOG stove rubbish ... sorry.
Hi Stu, you've mentioned before that your not keen on penny stoves, was wondering why that would be?
-
Bearbonesnorm
- Posts: 24197
- Joined: Sun Jun 05, 2011 8:53 pm
- Location: my own little world
Re: More MYOG stove rubbish ... sorry.
It's the priming/getting them to bloom quickly Ray. If you add a 'primer pan' to them they'll bloom much quicker but you're using more fuel, however once going they do tend to be pretty efficient as all the fuel is being burnt through the jets ... perhaps I shouldn't be so hard on themHi Stu, you've mentioned before that your not keen on penny stoves, was wondering why that would be?
May the bridges you burn light your way
Re: More MYOG stove rubbish ... sorry.
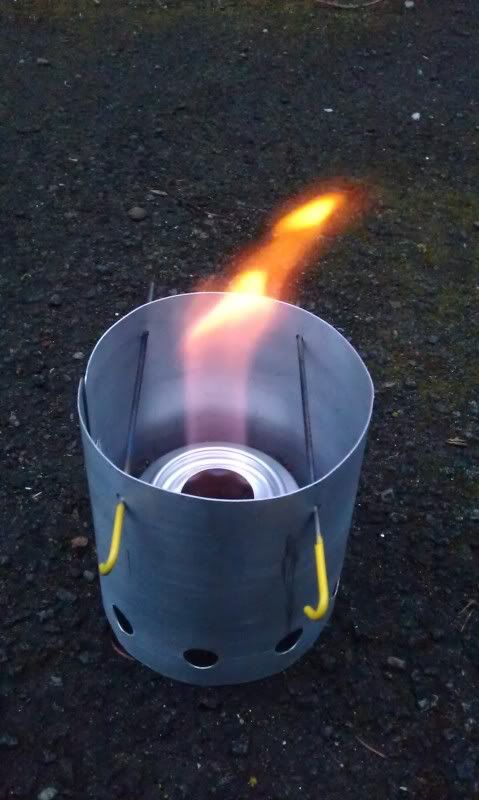
I'm not keen on the penny stove either Stuart.
I've just done similar for a 450 mug, but have made a caldera burner clone which is a chimney stove. One fierce central jet and you can drop pan on as soon as its lit. Zero faffage and very reliable.
In outdoor tests it consistently rolling boils 400ml in 6mins on 18mls of meths.
I'll post some pics once I've uploaded them to Photobucket. Uses 2 cokecan bases and a 45mm deoderant can.
Re: More MYOG stove rubbish ... sorry.
Can in a can

Just see the inner gold can
Central jet
Just see the inner gold can
Central jet
-
Bearbonesnorm
- Posts: 24197
- Joined: Sun Jun 05, 2011 8:53 pm
- Location: my own little world
Re: More MYOG stove rubbish ... sorry.
Very nice Anthony ... what relationship do you use between the inner and outer air holes? I'm sure I once read something like, they ought to be 3 - 1 by area.
May the bridges you burn light your way

Re: More MYOG stove rubbish ... sorry.
Same as the Caldera one I have
red bull cans work well for the inner also
red bull cans work well for the inner also
-
gairym
- Posts: 3151
- Joined: Tue Jan 10, 2012 11:05 am
- Location: Chamonix, France (but a Yorkshire lad).
Re: More MYOG stove rubbish ... sorry.
anthony,
that looks brilliant (just what i've been looking for in a stove).
but.....i can't figure out how it's put together and works from the photographs.
any chance of an explanation/link to an explanation/drawing/more photos/blueprints???
cheers, gairy.
that looks brilliant (just what i've been looking for in a stove).
but.....i can't figure out how it's put together and works from the photographs.
any chance of an explanation/link to an explanation/drawing/more photos/blueprints???
cheers, gairy.
Re: More MYOG stove rubbish ... sorry.
Stuart, Y'aduno?! Went with similar to the Caldera I copied originally. The inner certainly has more holes than the outer, probably about 2:1. The holes in the windshield are fine as the flame sits much higher up, in strong wind it can be upturned so vents are at top if needed.
Matt, Yup red bull cans (genuine only, copies tend to be about 2mm too big a diameter) work too and save about 8grams but, having trod on my original Caldera (hence 1st copy I made last year) the considerable strength it adds is welcomed!
Gairy, this is the diagram of the Mark1 which shows the principle-

But, the Kiticat base has been replaced with a 2nd coke can instead, to save weight and negates the use of glue.
So- (all sizes are approximate, you may need to play around with them)
1) Trim coke can base at approx 30mm and drill the holes in the lower lip. The aluminium is nice and thick here so makes drilling easier than through the sides.
2) Trim 2nd coke can base at approx 20mm. In the dimple score around a 2p and tear out. Press a golf ball into it to invert it to create the chimney.
3) Trim 45mm can base at approx 35mm(I used addidas deoderant iirc). Drill holes around top edge.
4) Place 45mm can central inside coke can base 1, place coke can base 2 on top and press together in normal popcan stove fashion, making sure the 45mm can locates into the ring on coke-can base 2.
Sorted.
Make sense? I'll try knock up a revised drawing.
The inner can acts as a vessel and is completely different to a normal twinwall (which allows fuel to sit in the cavity).
Matt, Yup red bull cans (genuine only, copies tend to be about 2mm too big a diameter) work too and save about 8grams but, having trod on my original Caldera (hence 1st copy I made last year) the considerable strength it adds is welcomed!
Gairy, this is the diagram of the Mark1 which shows the principle-
But, the Kiticat base has been replaced with a 2nd coke can instead, to save weight and negates the use of glue.
So- (all sizes are approximate, you may need to play around with them)
1) Trim coke can base at approx 30mm and drill the holes in the lower lip. The aluminium is nice and thick here so makes drilling easier than through the sides.
2) Trim 2nd coke can base at approx 20mm. In the dimple score around a 2p and tear out. Press a golf ball into it to invert it to create the chimney.
3) Trim 45mm can base at approx 35mm(I used addidas deoderant iirc). Drill holes around top edge.
4) Place 45mm can central inside coke can base 1, place coke can base 2 on top and press together in normal popcan stove fashion, making sure the 45mm can locates into the ring on coke-can base 2.
Sorted.
Make sense? I'll try knock up a revised drawing.
The inner can acts as a vessel and is completely different to a normal twinwall (which allows fuel to sit in the cavity).
-
gairym
- Posts: 3151
- Joined: Tue Jan 10, 2012 11:05 am
- Location: Chamonix, France (but a Yorkshire lad).
Re: More MYOG stove rubbish ... sorry.
great, thanks.
will give it a go and see if i've understood everything.
at least the principle makes sense now (which is a start).
a couple more quick questions:
- how many (and what-ish diameter) holes should i do (assuming regular coke sizing)?
- the 2:1/3:1 inner/outer hole ratio - am i right in assuming that the greater number is for the outer holes?
cheers, gairy.
Re: More MYOG stove rubbish ... sorry.
Sorry for crap drawing, here you go Gairy-
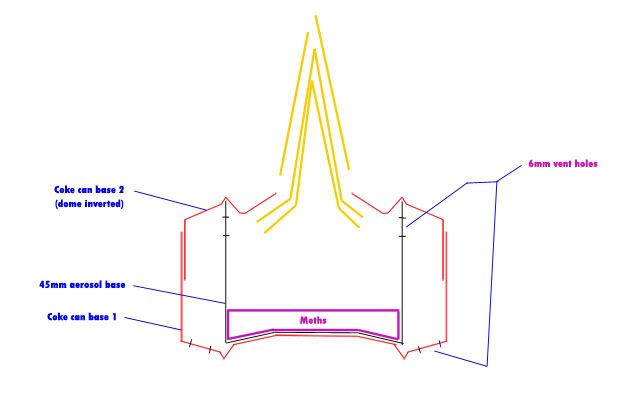
Nope, more holes on the inner cup. 5-6mm should be fine.
Obviously this style burner requires a stand to hold mug about 50mm above stove top.
Nope, more holes on the inner cup. 5-6mm should be fine.
Obviously this style burner requires a stand to hold mug about 50mm above stove top.
Re: More MYOG stove rubbish ... sorry.
Stuart, did you trim your windshield slots by scoring with a knife between 2 holes? It's very neat.
-
Bearbonesnorm
- Posts: 24197
- Joined: Sun Jun 05, 2011 8:53 pm
- Location: my own little world
Re: More MYOG stove rubbish ... sorry.
Mini cutting disc between 2 holesStuart, did you trim your windshield slots by scoring with a knife between 2 holes? It's very neat.
May the bridges you burn light your way
-
gairym
- Posts: 3151
- Joined: Tue Jan 10, 2012 11:05 am
- Location: Chamonix, France (but a Yorkshire lad).
Re: More MYOG stove rubbish ... sorry.
again - thanks.
how many holes did you use?Anthony wrote:Nope, more holes on the inner cup. 5-6mm should be fine.
Re: More MYOG stove rubbish ... sorry.
Inner cup from photo above - 10 x 5mm holes.
Outer can - 6 x 6mm holes (one above was actually only a mock up).
Iirc the original Caldera used less holes.
What I love is how reliable the chimney burners are in crap weather.
Outer can - 6 x 6mm holes (one above was actually only a mock up).
Iirc the original Caldera used less holes.
What I love is how reliable the chimney burners are in crap weather.
Re: More MYOG stove rubbish ... sorry.
Is there a trick to putting the two coke can halfs together as I seem to end up with dents or poor alignment. I've even tried freezing one half and heating the other all to no avail.
Re: More MYOG stove rubbish ... sorry.
Press a full can in first (only about 10mm or you'll get it stuck) to help open it up a bit.
You also need a small offcut, about 75x 25 with a very slight curve down one long edge. Use this as a sort of shoehorn.
It can indeed be chuffing annoying when they go in and crease up.
You also need a small offcut, about 75x 25 with a very slight curve down one long edge. Use this as a sort of shoehorn.
It can indeed be chuffing annoying when they go in and crease up.
Re: More MYOG stove rubbish ... sorry.
The 2 can's overlap in the 2nd pic is about to scale BTW.