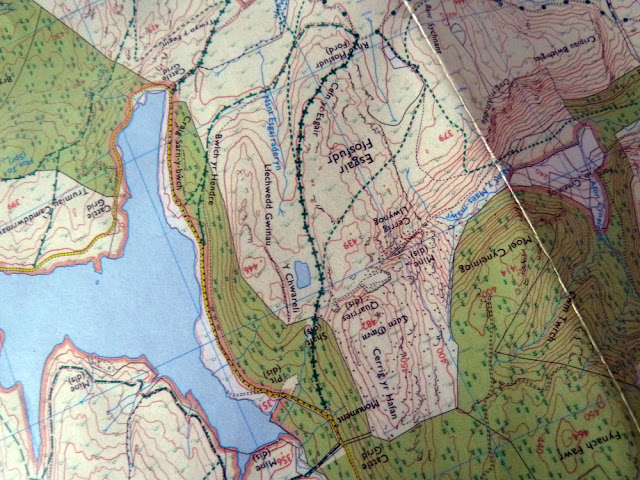
The UK has some of the best maps in the world! It might even be true to say that we have the very best maps in the world. That’s right, our little group of islands probably has more detailed, user friendly and useful map coverage than just about anywhere. – in fact, the maps of the UK are so good, that sometimes you really do wonder how people ever manage to get lost at all. Trouble is, no matter how good any map is, by itself it’s largely useless. Maps require an ‘operator’ and if the operator is also useless, then I think we can start to see where the potential problems might lie.
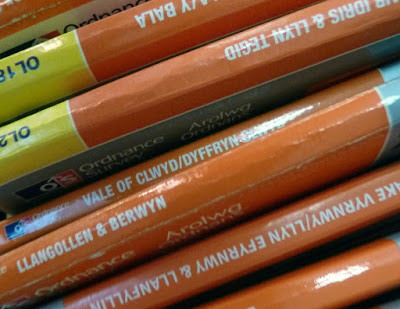 |
| Each one contains 100’s of potential adventures but you need to be able to read it. |
Ideally, as a map operator you should be a highly skilled individual with at least three bucket loads of first hand map experience and a full working understanding of wiggly lines and little crosses … but what if you’re not? What if you a really are a bit clueless? Well, there’s no need to worry. In truth, it only takes a few pointers and a little guidance to transform all those unintelligible squiggles, lines and symbols into something immensely useful and potentially very rewarding because ladies and gentlemen, a map and the ability to use it, is your gateway to ‘outside’. If you think knowing whether you’ll be gurning your way up a steep incline or whooping your way down a grin inducing descent might be useful or having the ability to spot potential overnight spots from a distance of thirty miles is a skill you’d be happy to possess, then read on. This certainly won’t be an in-depth guide to navigation but it should hopefully provide a degree of help to the hopeless and hope to the helpless or something like that.
Joining the dots to the dashes or where can I go?
Contrary to what some might practice, in England and Wales, you can’t simply ride your bike wherever the fancy takes you because there are rights of way to consider. Thankfully, all those that allow cycle access will be clearly highlighted on your map. Other RoW will also be present on the very same map but not all RoW are open to every mode of transport. You might think, ‘not bothered, I’ll just ride where I want’. I usually applaud a cavalier attitude but in this instance it’s one that sooner or later is likely to cause some conflict, general unpleasantness or maybe even injury should you decide that nondescript track running over MOD land is fair game. In time things will probably change but the fight for wider access certainly won’t be helped by you hurtling down a busy footpath or skidding into someones garden mid BBQ. … producing a map and explaining to a red faced landowner that you are indeed in the correct place and fully entitled to be there tends to quickly diffuse most situations, however standing there mumbling something about “I didn’t know” or “I thought it’d be alright” just makes you look like some kind of nob who shouldn’t really be out in the countryside without adequate adult supervision.
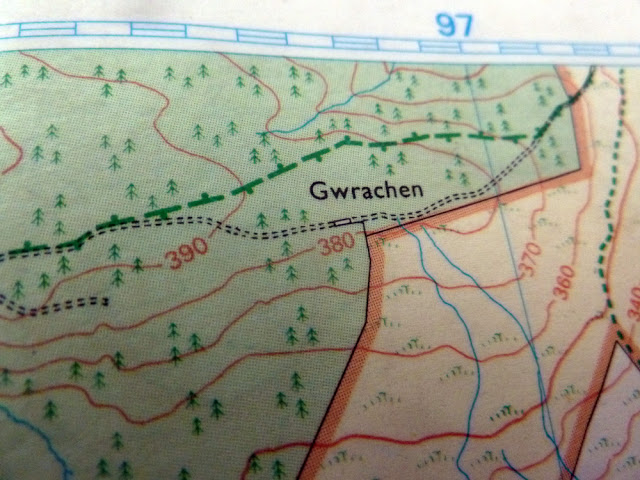
Anyway, I digress somewhat, so let’s have a look at the tracks and trails that are legally open to the two wheel traveller. Bridleways are perhaps the mainstay of off-road RoW for cyclists and if you’re using 1:25K OS mapping, you should be looking out for a long green dashed line to indicate their presence. In some parts of the UK the simple green dash will correspond to a perfectly formed track meandering across the countryside. However, in those parts of the country less frequented, you have no such guarantee and in many cases you will find absolutely no sign of the promised track or trail – remember, the indication of a RoW, does not indicate the existence of anything else. However, while searching your map for bridleways, you might notice that beneath some green dashes are smaller black dashes, sometimes they’re not easy to notice but they are generally a clear sign that something physical actually exists on the ground. You might still need to take a gamble on just how rideable it is but that kind of adds to the ‘fun’, doesn’t it?
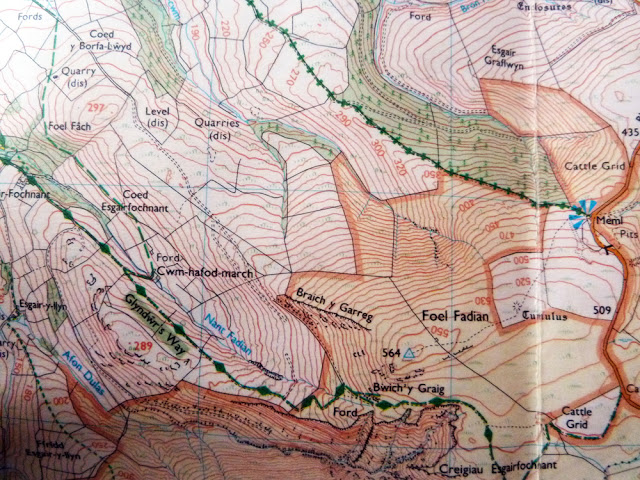 |
| A byway open to all traffic and a bridleway. The little diamonds indicate that the bridleway is also part of a recognised long distance footpath – but it’s still a bridleway. |
Aside from bridleways, you can also make use of tracks designated as ‘Byway open to all traffic’. You might imagine that a byway open to all traffic would likely be reasonably wide with a decent surface – don’t be fooled. ‘Boats’ can take many forms and some of the more popular can often be badly eroded from the effects of motorised traffic. Don’t think that’s necessarily a bad thing though, all those ruts, rocks and big deep puddles can provide endless entertainment for the adventurous bikepacker. Most areas tend to home less ‘boats’ than bridleways and the number is likely to decrease everywhere as many are downgraded in an effort to reduce 4×4 and motorcycle use. You can spot a ‘boat’ on the map by a series of green crosses. Those that have being downgraded to restricted byways will have had the alternating top / bottom of the crosses removed and yes, you can cycle on them all.
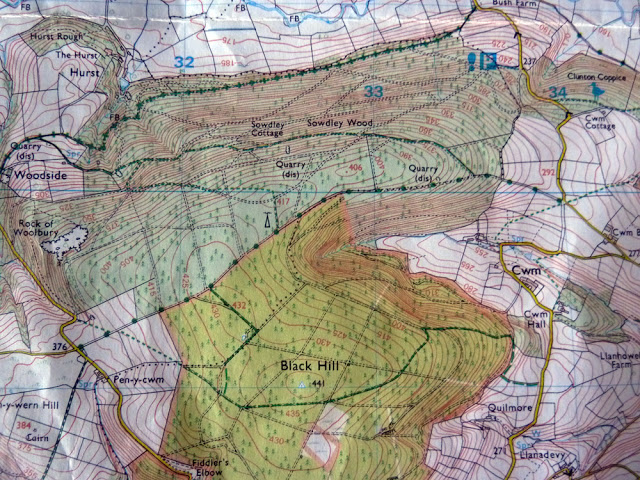
Is there anywhere else you can go? Yes. Firstly, red dots on the map indicate a ‘traffic free cycle route’. It may be part of a larger, perhaps national route or it might simply be something implemented by a local council, trust or such but you’re obviously allowed to ride a bike on it. Another RoW to be aware of is ‘other route with public access’. It’s somewhat ambiguous as it doesn’t imply who (other than the public) has access but in the majority of cases you should be fine – you’ll see them on the map as green dots. Next, there are ‘permissive bridleways’, these look the same as normal bridleways except the dashes are red rather than green; you just need to be aware that the landowner can withdraw permission at any point, can decide who can and who can’t use it and they must display signage indicating that the track is open on a permissive basis and no legal RoW exists … that might sound a little contrived but in reality, you can usually treat them as you would a common or garden bridleway. Finally, there are ‘publicly owned’ forests and more precisely, the tracks within them. As long as the tracks aren’t designated footpaths, then you should be absolutely fine riding within Forestry Commission or Natural Recourses Wales land. All of these will be shaded bright green while privately owned forests are dull green on the map … and of course you’ll know that both are forests because they’ll contain little pictures if trees, won’t they?
I think that in the majority of cases, you should allow common sense and local knowledge to be your guide when deciding whether or not to use a particular track. In the case of the above photograph (actually the one above that), no one would deviate off the good track, fight their way through whatever’s there only to rejoin the same track 200m further on – use your discretion but I would say, any routes you’re going to ‘make public’ would be best kept to legal RoW.
Contours – what goes round and up and down.
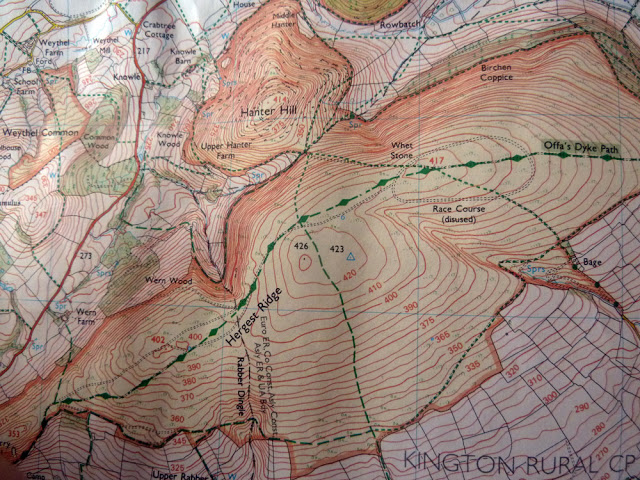
I like to think of contour lines as the skeleton of a map. They’re the things that provide shape and with a little practice allow your minds eye to view a flat 2D map as a 3D image. Contour lines show both the shape and gradient of the land, so they’re actually quite important to us, yet they’re often overlooked or in many cases, just ignored. As you might imagine, contour lines are drawn around the contour of a hill, slope or incline. They are placed at 10 metre or 5 metre intervals measured as vertical height (this varies map to map but it will be stated in the map legend, in reality, it won’t matter too much to you) – imagine three 10m contour lines with a wide gap between them, they would tell you that the vertical height gain between the the three is 20m which when spread over a wide distance indicates a fairly gentle incline. Now imagine the same lines but very closely packed together with only a tiny gap between them. They’re still indicating an overall height gain of 20m but in a much shorter distance which must mean the ground is considerably steeper.
You should notice that some contour lines are are also marked with numbers. These numbers are the height of that point above sea level in metres. It is possible to work out whether your intended destination lies at the top of a hill or at the bottom just by looking at the pattern formed by the contour lines but if you’re in any doubt, the height numbers will provide a definite answer.
Besides revealing the ups and downs, contour lines will also point you in the direction of flat areas of ground – very useful should you be searching for an overnight spot on the side of a mountain. What you’re looking for is a single line that produces what might be described as an ‘island’. A small island encircled by a much larger one would show the position of a small ‘hill’ on an otherwise flat(ish) area … it might just be a dry haven on an otherwise boggy plateau. How about two little ‘islands’ close together? Well, that’ll be two little hills or mounds which could provide some additional shelter if you decided to pitch up between them.
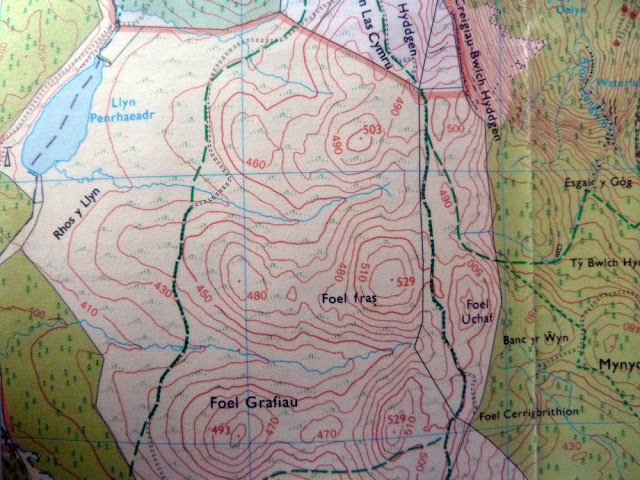 |
| Contour lines allow you to see the map in your mind in 3D. From the west (depending where you were standing), you would see what might look like 3 hills separated by 2 narrow valleys |
Contour lines probably are one of the most important things that appear on a map, they can tell you an awful lot. Learn to read them rather than ignore them.
WTF am I?
Ahh, grid references, understanding them (which isn’t actually difficult) is the key to both finding places but also and maybe more importantly – someone finding you.
If you look at your map, you’ll see that it’s divided into small squares by thin blue lines and each square represents one square kilometer. The thin blue lines that run vertically are called ‘Eastings’ and those that run horizontally are known as ‘Northings’ and each one will have a number corresponding to it on the edge of the map (the number will also be repeated in a few points along the line) … more of those in a minute but first we need to locate the map reference number.
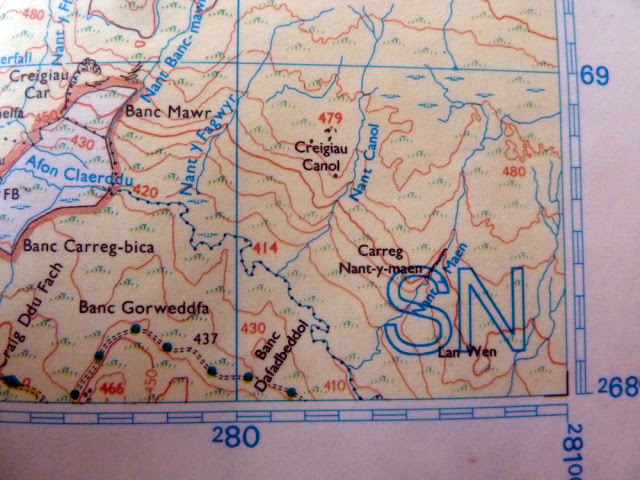
The whole of the country is divided into areas and each one is allocated a two letter reference such as SJ or SO. Without prefixing your grid reference with these letters, the grid reference will be largely useless as the numbers alone will not pinpoint one unique site but instead, a number of potential sites that could be scattered all over the country. The letters can usually be found at the corners of the map but be aware that some maps cover an area where one stops and another starts, meaning part of your map will have one prefix and the other part will have another.
Have we got that? Good. Now let’s imagine that someone has told you of a superb overnight spot and to help you locate it they’ve furnished you with a grid reference of SN 7828. The first thing you need to do is find out which map or area has the prefix SN attached to it. It could be any map couldn’t it but chances are you’ll know which map it is as you’ll already know which area of the country you’re heading for or if they’re kind, they’ll have said, “it’s on Explorer 214”. Fingers crossed you’ve now got the correct map and obviously you’ve checked the corners to make sure it says SN. Now look along the bottom or top of your map and find the thin blue line (remember, the Eastings because they run west to east) with the number 78 and put your finger on it. Now we need to find the Northing (that’s right, they run south to north) so search down the sides of your map until you find the blue line with the number 28 – yeah and put your finger on that too.
Hopefully you’re still with me and for those that are – move both your fingers onto the map following the lines until they intersect; when they do, the square above the Northing and to the right of Easting is the one you want – JACKPOT! Err, no not quite. Sadly your quest for the perfect overnight spot has put you within the vicinity but has left you with the task of sifting through a 1km square haystack in search of a needle. What we need is a way of narrowing things down and I’m afraid that will require yet more numbers.
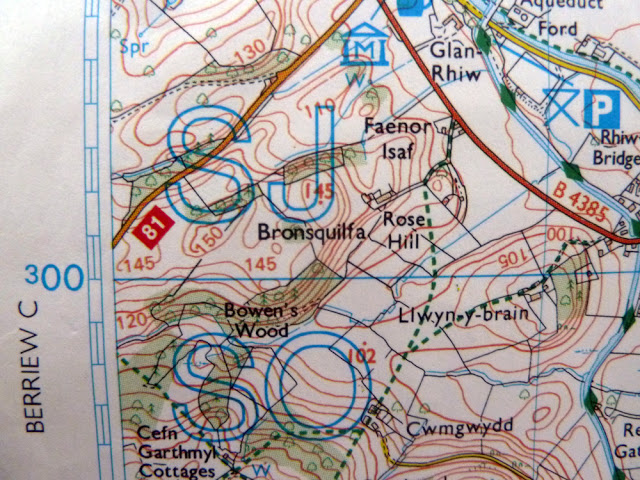 |
| SO and SJ on the same map. Keep an eye on it because the same number with different prefixes are 2 very different places. Easting / Northings going to 00 is your clue to a change. |
We can still work with SN 7828 but we’re going to insert two more numbers to produce a six figure grid reference – let’s add 3 and 8. Now our grid reference is SN 783288, I’ve made the additions bold so you can see where they’ve gone. Returning back to your grid square, draw an imaginary eight Eastings and eight Northings in it so you now have ten equally spaced lines running both across the square and up and down it. Now do exactly what you did to locate the square but on a smaller scale … count three lines across and eight lines up and the point where they meet, is the point you require. Turning the reference from four to six figures has reduced the search area from one square kilometer to 10,000 square metres, which is 100m x 100m and isn’t as big an area as it sounds; hopefully it should be accurate enough to enable you to find what you’re looking for.
I really do hope that makes sense because to be perfectly honest with you, I can’t be bothered explaining in all again but even if it seems quite complicated, be assured that with a little practice you’ll be reeling off grid references quickly and accurately without the use of any fingers or the need to count out loud.
Which way’s up?
Unfold your map and turn it around until you can read the words on it without having to tilt your head at a weird angle (I should just say here – if you’re holding a map of Wales, don’t worry so much about reading the words, simply getting the letters the correct way up will suffice) with that done, the top of your map will indicate north, the bottom south, left west and obviously (it is obvious isn’t it?) the right hand side will be east. If you have trouble remembering which is which, simply start at the top and move clockwise while muttering ‘Never Eat Shredded Wheat’ to yourself. Right then, with your map now positioned in accordance with the universe, you might be thinking that you’re half way home and very nearly dry – sadly not.
Rather than holding the map with north at the top, you’ll have a far greater chance of successful navigation if you orientate the map in the direction of travel – that is to say, turn it about until it’s pointing the same way you are. Doing this will present you with a far clearer picture of what lies ahead, what you can expect to see over the next hill or round the next bend and it’ll also help greatly in relating all those squiggles and stuff on the paper to the features present on the ground and around you. Most gps will allow you to do the same thing by selecting ‘map up’ rather than ‘north up’ in the menu.
As I’m sure you can imagine, there’s plenty more to go at but it’s time I made a brew and you’re probably fed up of reading, so I’ll return with part 2 next week.
